
If you adjust the margins before removing the background, you will have to crop again afterward. If you add keywords before splitting objects, you will need to revise the title and keywords for each resulting file.
That is why it helps to keep the order fixed.
Background removal → margin cropping → object splitting → keywords
Prepare the files themselves in the earlier stages, then add search information once the final file structure is settled.
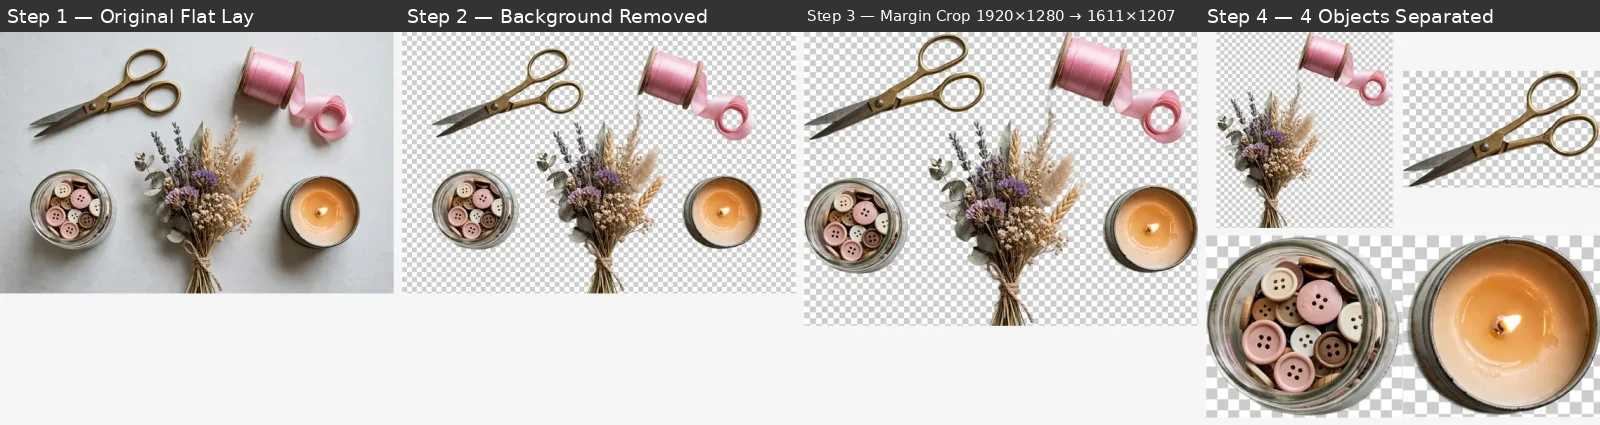
Background removal is a local result using the same model (isnet-w8) and processing approach as the live tool; it is not a pixel-identical match. Margin cropping and object splitting are pixel-identical reproductions. This is an element workflow using a flat-lay image with subjects, not a background-image demonstration.
1. Remove the background first
This is the stage that most often causes trouble.
Fine details such as hair and flower stems, or materials with soft or transparent edges such as glass, can retain background fragments or lose parts of the subject. When the subject and background have similar colors, the outline may break into wavy edges. In flat-lay photos, floor shadows can remain attached to the subject.
At this stage, do not check only whether the background is gone.
Zoom in and examine the edges.
- Are fine details still intact?
- Is any background color left around the subject?
- Have you decided whether to retain the shadow as part of the subject or remove it?
- Are the edges of transparent or reflective materials still intact?
If fine details are badly broken, starting again with a higher-resolution original is often faster than continuing to retouch the result.
Decide what to do with shadows here too. Leaving it until after splitting means you will have to recreate files from later stages.
For transparent or reflective materials, a shot against a solid-color background with less transparency and clearer edges is easier to work with when available.
The pass criterion at this stage is whether the subject’s edges remain intact, rather than simply whether the background is gone.
2. Clean up empty margins
A transparent PNG after background removal can contain more empty space than necessary.
Trim that space relative to the subject.
The aim is not to cut right against the subject’s edges. Cropping too tightly can make one image look crowded when several are listed together, leaving the scale of the set inconsistent.
Apply similar margin rules to images you will upload together.
If the crop is positioned strangely, revisit step 1 first. Faint translucent traces or background fragments can make the image boundary appear farther out than the actual subject.
Images whose empty space is part of their composition or design are exceptions. They should not automatically be cropped tightly.
The criterion here is a natural margin when viewed in the same list, rather than the smallest possible margin.
3. Split only the objects you need
If a transparent PNG contains several elements, now split them into individual files.
Do not turn everything visible into a separate file.
Split elements that someone would have a reason to search for individually.
For example, making separate files for every tiny sparkle, pollen speck or decorative dot around the main object may increase the file count without adding much practical value.
Conversely, separate elements that people could search for and use independently, even if they appear in the same image.
Overlapping or touching objects may be detected as one connected shape. In that case, adjust the selection and cut them out one by one instead of trying to split everything automatically at once.
Deciding what to split takes more time here than the technical splitting itself.
Will this stay only in the set, or will you also upload it individually?
The goal is to create searchable units, rather than increase the number of files.
4. Add titles and keywords last
Choose titles and keywords after the file structure is final.
A common mistake here is using a sentence that describes the image as though it were a search term.
For example, “a dried-flower bouquet by a window” describes an image.
But the words buyers type into search are usually closer to the actual subject and use, such as “dried flowers”, “bouquet”, “lavender” or “floral background”.
Do not copy the same keywords unchanged between individual items and sets.
A set is for someone looking for several elements together; an individual item is for someone looking for that one object. If the file has changed, reconsider the search intent too.
Start titles with color + material + noun, then add keywords that a buyer might actually type into the search box.
This is also why keywords come last.
Files may be combined, split or excluded in earlier stages. Adding keywords beforehand means removing keywords for discarded elements and adding them again to new files.
Finalize the file structure first, and add search terms last.
If a later stage looks wrong, revisit an earlier one
Follow the stages in order.
If cropping looks wrong, check for leftover background. If splitting looks wrong, review the crop and edges. If the file structure keeps changing while you add keywords, the splitting decisions are not finished yet.
It is better to return to the stage where the problem began than to force a fix at a later stage.
The working order is as follows.
Remove the background properly. → Apply consistent margins. → Split only objects worth searching for. → Add titles and keywords to the final files.
Everything in this process runs in the browser, and files are not sent to a server. You can use the same workflow for new work you have not published yet.